Ads by Sale Clipper won’t show up on sites unless there is adware sitting in the specific computer, so it’s about time to bust some virus activity red-handed.
Advertisements displayed on websites can be split into two principal groups. Although they all look basically the same, the conventional demarcation goes along the distinct line between one’s PC and the open Internet. Most ads originate on the web page level, and these are perfectly passable from a legal viewpoint as long as the site administrators allow this content to be presented by interested parties. But there is another category, which is strictly workstation-related. It relies on software rather than some HTML scripts and the like. Now, most of the applications representing this cluster tend to be flagged as adware, because their operational cycle – ranging from installation to the vile “malvertising” effect – does not take the user’s computer management role seriously.

Sale Clipper home site
Sale Clipper is the self-explanatory name of an app that purports to ease and otherwise enhance one’s online shopping experience. Very few people who run into it are aware, though, that its functioning fits into the generic adware scheme. This product’s ultimate goal being all about serving ads to victims, its way into a computer is equivocal as the users hardly ever participate in the setup authorization process. The spreading of some cheesy freeware and shareware is secured by installation clients, whose peculiarity is that random items can be additionally included as part of the package. As a result, the infection is dropped onto the system while the users think they have installed something different, for example, the jDownloader tool or a new movie player.

ads-by-sale-clipper
The day this intrusion takes place becomes a bad day for the person who’s browsing the web on that computer. This is because Chrome, FF and IE get a new helper object attached to them, the onset of which co-occurs with the appearance of Sale Clipper virus. The extension displays tons of comparison shopping information and coupons on every website, including search engines and social networks, and it’s not the sites to blame for this. As mentioned, the instigator of these events should be looked for in the PC. Overcoming this malicious effect by simply uninstalling the imposed add-on is impracticable, so it’s recommended to adopt a smarter approach.
Automatic removal of the Sale Clipper virus
When it comes to handling infections like this one, using a reputable cleaning tool is the place to start. Sticking to this workflow ensures that every component of the adware gets found and eradicated from the affected computer.
1. Download and install the cleaning tool and click the Start Computer Scan button
Download Ads by Sale Clipper removal tool
2. The wait is worth it. Once the scan completes, you will see a report listing all malicious or potentially unwanted objects detected on your PC. Go ahead and click the Fix Threats option in order to get Sale Clipper automatically uninstalled from your machine. This being done, you should be good to go. Just to make sure everything went smooth, consider going through the steps below real quick.
Uninstall troublesome program through Control Panel
- From your Windows menu, go to Control Panel. Select Add or Remove Programs (for Windows XP / Windows 8) or Uninstall a program (Windows Vista / Windows 7)
![Uninstall a program]()
- Look carefully through the list and locate Sale Clipper or other suspicious program that shouldn’t be there. Select the bug and click Uninstall/Change
![Uninstall Sale Clipper]()


Remove Sale Clipper Ads virus from web browsers manually
The workflow covered below is intended to undo all changes that the Sale Clipper infection made to Chrome, Firefox and Internet Explorer. Be advised there’s some collateral inconvenience you will encounter, namely the loss of all installed add-ons and personalized information (saved passwords, cached data, bookmarks and other content).
Reset Chrome
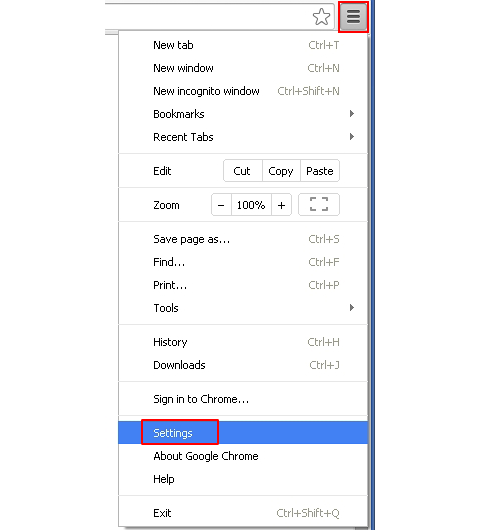
- Open Google Chrome. Click the Chrome menu icon as shown on the image and select Settings
![Reset Chrome 1]()
- Click Show advanced settings
![Reset Chrome 2]()
- Hit the Reset browser settings button
![Reset Chrome 3]()
- On the warning that popped up, read everything you should know about the consequences of the reset. Click Reset if you want to complete the procedure
![Reset Chrome 4]()
- Restart Chrome for the changes to take effect


Reset Firefox
- Open Firefox. Go to Help > Troubleshooting Information or type about:support in the URL field
![Reset Firefox 1]()
- Click Refresh Firefox button to get the job done
![Refresh Firefox]()
- Restart Firefox for the changes to take effect


Reset Internet Explorer
- Open IE. Go to Tools > Internet Options
![Reset Internet Explorer 1]()
- Hit the Advanced tab and click Reset
![Reset Internet Explorer 2]()
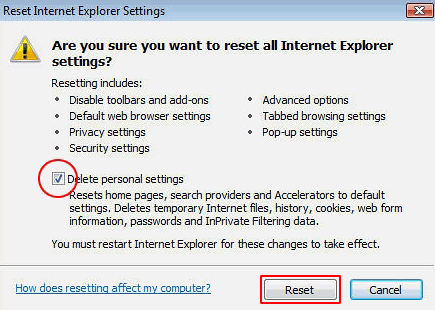
- Make sure the Delete personal settings option on the Reset Internet Explorer Settings dialog is ticked and click Reset
![Reset Internet Explorer 3]()
- Restart Internet Explorer for the changes to take effect


Did the problem go away? Check and see
Computer threats like Sale Clipper can be stealthier than you can imagine, skillfully obfuscating their components inside a compromised computer to evade removal. Therefore by running an additional security scan you will dot the i’s and cross the t’s in terms of the cleanup.
Download Sale Clipper scanner and remover
The post Remove Sale Clipper ads from Chrome, Mozilla Firefox and Internet Explorer appeared first on Keone Software.


