Quantcast
Channel: Keone Software

Get rid of Bing redirect virus from Safari on Mac (MacBook Air/Pro, iMac)

$
0
0

What’s particularly irritating about the Bing redirect virus is that it keeps the affected Mac users from searching the web with any other provider.

What is the Bing redirect Mac virus?

In today’s world of ubiquitous digitalization and high-end technologies, Internet traffic is a valuable product that costs money to obtain. Ideally, the end users maintain full control of which sites they visit and when. This paradigm drives permanent improvements of web services whose proprietors strive to offer something better than the others and thus entice people to get aboard. This is the ideal, ethical model that doesn’t always work the way it should, though. The Bing redirect Mac virus is an example of a crooked online marketing that definitely deviates from the norm. The Mac users who fall victim to this infection experience iterative Safari redirects to bing.com for seemingly no apparent reason.

Infected Mac users' traffic is constantly forwarded to bing.com

Infected Mac users’ traffic is constantly forwarded to bing.com

It’s important to emphasize at this point that the landing page is an entirely legitimate search engine brought to millions of users by Microsoft, and blaming the twisted traffic on this provider is a misinterpretation. No wonder many victims find it strange that a piece of malware reroutes their Safari browser to the reputable, although far from the most popular search engine. There is an explanation to this oddity. Every single time the redirect happens, the Mac user’s online traffic is tunneled through several transitional domains. One of the interim URLs currently in rotation is searchbaron.com, with the sites switching from time to time. This activity is hardly visible to the naked eye, but technically, the intercepted web navigation follows a complex path and hits a number of web pages related to ad networks or similar services. In the end, it’s the trusted Bing homepage, so some infected Mac users go ahead and try to take a dive into the Safari settings to select the preferred provider. However, their efforts fail. Why? Because the configuration changes ensue from malicious activity.

The Bing redirect virus infiltrates Mac computers via a prosaic, yet effective technique. It’s about bundling, a method used to spread harmful applications alongside safe ones. These downloads are typically hosted on unofficial sources with poor reputation, where the individuals in charge rake in profits by cross-promoting various controversial programs. If the person who’s installing some nice little applet opts for the recommended (default) setup, they run the risk of additionally agreeing to install the malware without realizing it. Upon contaminating a Mac in such a furtive fashion, the infection gives Safari settings an overhaul and may also tamper with the system’s DNS settings.

As a result, whenever the victim tries to find random information via their search engine of choice, they will be ending up on bing.com in the long run. It’s due to this in-depth interference that the repair is more complicated than merely altering the browser settings by hand. Thankfully, there is a way to tackle the problem in a few minutes. Keep reading to get an idea of the Bing redirect Mac virus removal done right.

Automatic removal of Bing redirect virus from Mac

When it comes to handling infections like this one, using a reputable cleaning tool is the place to start. Sticking to this workflow ensures that every component of the virus gets found and eradicated from the affected Mac.

1. Download and install Combo Cleaner onto your Mac.

Download Bing redirect virus removal tool

2. Run the tool and click Start Combo Scan to have it check your Mac for threats. The wait is worth it. Once the scan completes, you will see a report listing all performance issues as well as malicious or potentially unwanted objects detected on your machine.
Mac scan with Combo Cleaner

3. Go ahead and click the Remove Selected Items option in order to get Bing redirect virus automatically uninstalled from your Mac.

This being done, you should be good to go. Just to make sure everything went smooth, though, consider going through the steps below. Furthermore, be advised that Safari will still be redirected to bing.com until you rectify its settings (the reset procedure will be described further down).

Bing redirect virus manual removal from Mac

The gist of this section is to walk you through the process of deleting all non-obfuscated files related to the Bing redirect virus Mac. It’s best to perform the cleanup in the order specified below.

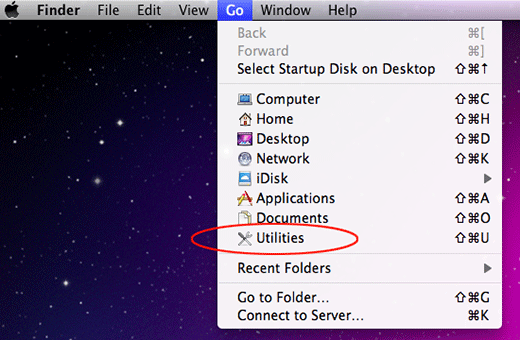
  • Click the Go icon in Finder and select Utilities on the listGo to Utilities on Mac
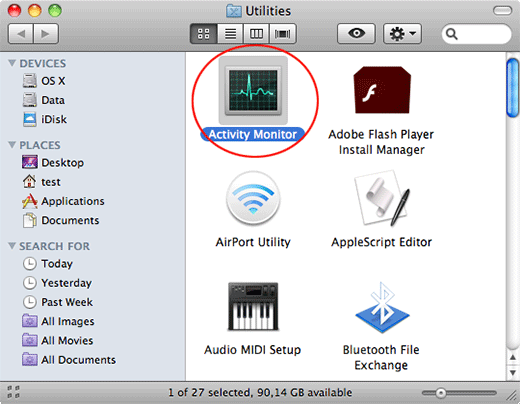
  • Find and select the Activity Monitor under UtilitiesAccess the Activity Monitor
  • In the Activity Monitor, scrutinize the running processes for one that consumes lots of CPU and looks suspicious. Once the likely baddie is found, select it and click the Quit Process icon. An additional confirmation dialog will pop up – click Force Quit on itEnd the potential pest’s process
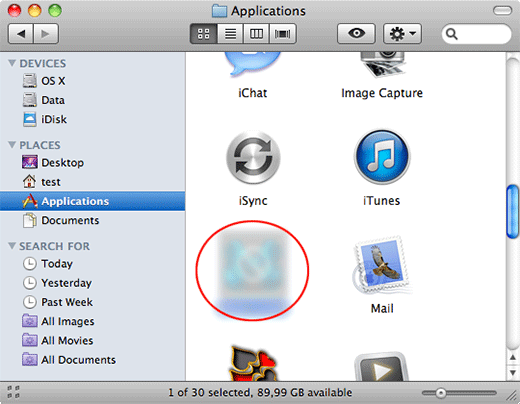
  • Now, go to Applications under the Go menuGo to Applications
  • What you need to do is scroll down the list of installed apps in search of the malicious item. It could be a program with a gibberish name or one that ended up on your Mac beyond your awarenessUninstall the malicious app
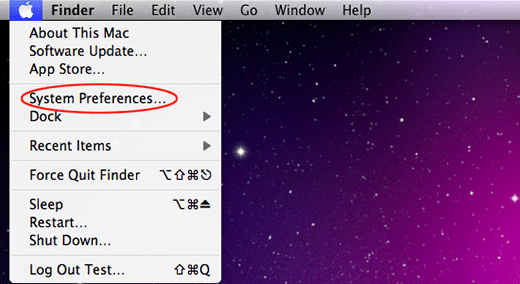
  • Go to System Preferences as shown belowSystem Preferences on Mac
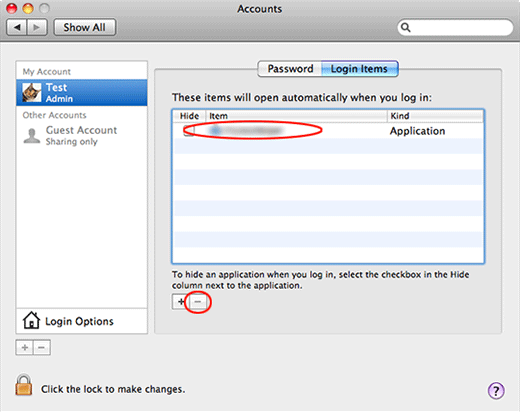
  • Select Accounts, then Login Items. You will see all the apps that run as part of the Mac startup process. Find the infection and remove it from the list by means of the “minus” iconMinus out the malware from Login Items

Now that you have suppressed the virus proper, you need to fix the redirect problem in Safari. The browser defaults continue to be set to Bing, therefore the repair requires some manual configuration tweaking.

Remove Bing redirect Mac virus from Safari

The optimal troubleshooting method boils down to resetting Safari, which will undo all changes made by the infection or any third-party plugin without your permission. Here’s how to do it:

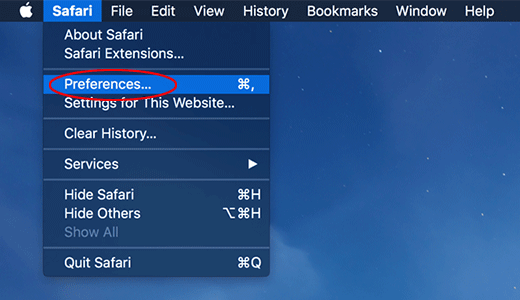
  • In Safari, select Preferences as illustrated belowSafari Preferences
  • Go to the Privacy subsection and click the button saying Remove All Website DataSafari – Remove All Website Data
  • The system will generate a popup message highlighting some must-know aspects of the refresh. For instance, the procedure will most likely log you out of sites you have accounts with. If that’s fine with you, click Remove Now on the dialogWebsite data removal in Safari – the confirmation
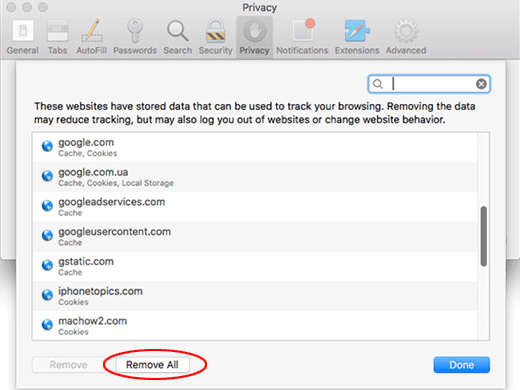
  • You will now see a full list of websites that retain cache, cookies, and other data associated with your browsing sessions. One of the options is to pick the clearly dubious ones and click Remove. However, it’s recommended to select Remove All for a greater efficiency of the repairRemove fingerprintable data stored by websites
  • Hit the Done button to start fresh with Safari. The Bing redirect Mac virus is now completely removed and it won’t be meddling with your web surfing anymore.

The post Get rid of Bing redirect virus from Safari on Mac (MacBook Air/Pro, iMac) appeared first on Keone Software.
Remove SearchBaron.com redirect virus from Mac

$
0
0

macOS is an expanding cyber battlefield, with browser redirect viruses like SearchBaron infiltrating Mac computers to wreak havoc with the victims’ web surfing.

What is the SearchBaron Mac redirect virus?

There is no such thing as a Mac immune to malware these days. As a matter of fact, this myth was debunked years ago, and the current state of affairs in this electronic ecosystem is increasingly disconcerting. Out of all categories of harmful code targeting Apple’s machines, browser infections are in a dominant position due to their quantitative prevalence. Many of these culprits never reach any considerable heights in terms of the propagation, but some become really mainstream in the campaigns masterminded by residents of the dark web. It’s the latter type that the SearchBaron Mac virus represents. Thousands of users around the world have reported being hit by this pest, and the numbers continue to grow. So, what kind of a threat is it and how exactly does it affect systems? It manifests itself through frequent redirects in a Mac user’s preferred browser. The starting point of this Internet traffic rerouting is searchbaron.com, with additional elements complementing the URL.

Web browser being forwarded to searchbaron.com on Mac

Web browser being forwarded to searchbaron.com on Mac

In most cases, the kick-off of the redirect is a domain that comes in the following format: searchbaron.com/v1/hostedsearch?pid=[numeric value]&subid[campaign ID]&keyword=[search term]. The random-looking numbers denote the attributes of a specific malvertising campaign, and the string at the end of the address is a word or phrase that the victim was trying to look up on the Internet. This brings us to the mechanics of the hoax: the infected user’s online navigation undergoes the forwarding predicament whenever they try to do a commonplace search on Google or another legit provider. Instead of going the regular path, the traffic is intercepted and first travels to searchbaron.com, then passes through a series of intermediary URLs, and usually arrives at Bing, Microsoft’s search engine.

In order to figure out the purpose of this ostensibly intricate fraud, it suffices to grasp the idea of black hat Internet marketing. A large number of unique visits help web resources get a better visibility on search engines, plus every such user is deemed as a potential customer. When the SearchBaron virus attack is underway, the victim actually hits several pages prior to landing at bing.com. All of these momentary visits accumulate to bring the cybercriminals sizeable profits stemming from traffic monetization. The problem is, obviously, that the user doesn’t opt for such a drastic change of their web browsing activity. The malicious object sneaks into Macs furtively, being integrated in multi-pronged installation clients for other software that’s benign. Unless the Mac user identifies the dubious bundling, they run the risk of unknowingly allowing the adverse interference of SearchBaron. If this is the case, the only effective way to sort the issue is to delete the virus itself and then re-adjust the settings of the misbehaving browser.

Automatic removal of SearchBaron redirect virus from Mac

When it comes to handling infections like this one, using a reputable cleaning tool is the place to start. Sticking to this workflow ensures that every component of the virus gets found and eradicated from the affected Mac.

1. Download and install Combo Cleaner onto your Mac.

Download SearchBaron virus removal tool

2. Run the tool and click Start Combo Scan to have it check your Mac for threats. The wait is worth it. Once the scan completes, you will see a report listing all performance issues as well as malicious or potentially unwanted objects detected on your machine.
Mac scan with Combo Cleaner

3. Go ahead and click the Remove Selected Items option in order to get SearchBaron redirect virus automatically uninstalled from your Mac.

This being done, you should be good to go. Just to make sure everything went smooth, though, consider going through the steps below. Furthermore, be advised that your default browser will still be redirected to searchbaron.com until you rectify its settings (the reset procedure will be described further down).

SearchBaron redirect virus manual removal from Mac

The gist of this section is to walk you through the process of deleting all non-obfuscated files related to the SearchBaron redirect virus Mac. It’s best to perform the cleanup in the order specified below.

  • Click the Go icon in Finder and select Utilities on the listGo to Utilities on Mac
  • Find and select the Activity Monitor under UtilitiesAccess the Activity Monitor
  • In the Activity Monitor, scrutinize the running processes for one that consumes lots of CPU and looks suspicious. Once the likely baddie is found, select it and click the Quit Process icon. An additional confirmation dialog will pop up – click Force Quit on itEnd the potential pest’s process
  • Now, go to Applications under the Go menuGo to Applications
  • What you need to do is scroll down the list of installed apps in search of the malicious item. It could be a program with a gibberish name or one that ended up on your Mac beyond your awarenessUninstall the malicious app
  • Go to System Preferences as shown belowSystem Preferences on Mac
  • Select Accounts, then Login Items. You will see all the apps that run as part of the Mac startup process. Find the infection and remove it from the list by means of the “minus” iconMinus out the malware from Login Items

Now that you have suppressed the virus proper, you need to fix the redirect problem in the malfunctioning browser. The browser defaults continue to be set to searchbaron.com, therefore the repair requires some manual configuration tweaking.

Remove Search Baron redirects from affected browser on Mac

The optimal troubleshooting method boils down to resetting the browser, which will undo all changes made by the infection or any third-party plugin without your permission. Here’s how to do it:

1. Reset Safari to its defaults

  • Go to Safari menu bar and select Preferences again on the drop-down listSafari menu bar - Preferences
  • Go to Advanced tab and enable the option that says Show Develop menu in menu barShow Develop menu in menu bar
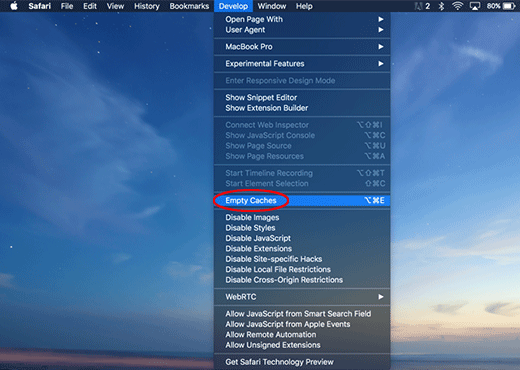
  • Now you will see the extra Develop menu in your Safari menu bar. Click it and select Empty Caches as shown belowEmpty Caches in Safari’s Develop menu
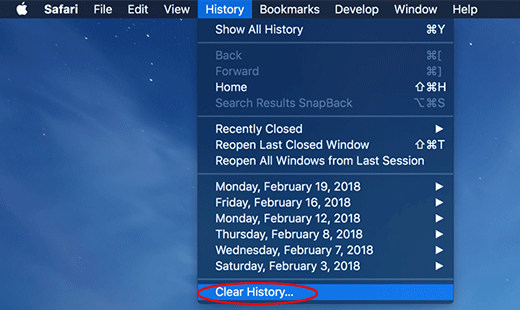
  • Do some test browsing to see if things are okay now and whether the malware is gone. If the issue is still there, you may need to additionally clear your browsing history in Safari. In Safari menu bar, select History and click Clear HistoryClear history in Safari
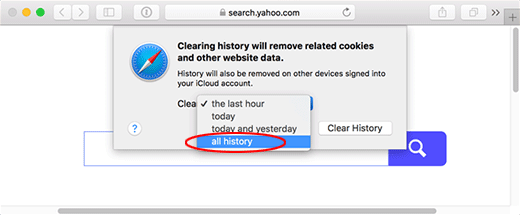
  • The browser will display a dialog so that you can select the required period you would like to clear history for. Select all history on the list and click the Clear History buttonSelect period to remove history in Safari
  • In case Safari is still acting up due to malware interference, there is one more thing you can try. Once again, go to Preferences from the Safari menu bar and select the Privacy tab this time. Click Manage Website DataManage Website Data option in Safari
  • When Safari generates a full list of sites that have stored your browsing data, go ahead and click Remove AllRemove all website data
  • Confirm by hitting the Done button.

2. Reset Google Chrome

  • Click More ( icon) at the top right part of the Chrome window and select Settings
  • Find the Advanced section on the Settings screen and expand it
  • Locate the Reset settings subsection and click Restore settings to their original defaultsReset Chrome settings on Mac
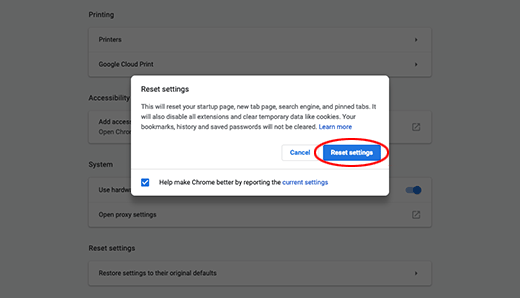
  • Google Chrome will display a popup dialog asking you to confirm the reset. Click the Reset settings button on it. Now, restart the browser and ascertain that the problem has been fixed.

3. Refresh Mozilla Firefox

  • Go to Help -> Troubleshooting Information, or type about:support in the Firefox URL bar
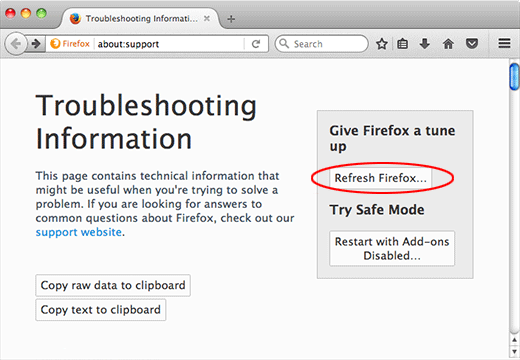
  • Once the Troubleshooting Information screen appears, find and click the Refresh Firefox button as shownRefresh Firefox on Mac
  • Confirm the browser refresh on a dialog that will appear. Restart Firefox and check it for signs of malware tampering.

The post Remove SearchBaron.com redirect virus from Mac appeared first on Keone Software.
.Masok file extension virus decryptor and ransomware removal

$
0
0

The makers of the Djvu ransomware family continue to release new spinoffs of their harmful code, with the .masok file variant being the latest one on the list.

What is Masok ransomware?

Amidst the long-lasting hiatus in ransomware activity overall, some lineages continue to be active and still pose a serious risk to home users and businesses across the globe. The strain referred to as Djvu, or STOP ransomware, is one of the few that receive updates on a regular basis. It has recently expanded with a fresh remake that stains encrypted files with the .masok extension. It additionally creates a rescue note named _readme.txt, which is added to every folder with encoded information in it. Aside from the above-mentioned peculiar suffix, this infection does not alter the original filenames. Therefore, a random file Test.xlsx is renamed to Test.xlsx.masok. The pest uses symmetric AES-256 cryptographic standard to lock down the victim’s personal data. The crypto implementation is mostly flawless, therefore the odds of restoring the files are low unless the affected user has the decryption key.

New Djvu ransomware version adds the .masok extension to files

New Djvu ransomware version adds the .masok extension to files

Masok ransomware is typically distributed by means of spam. The extortionists are leveraging malicious properties of a botnet to send out misleading emails in bulk. These messages can be masqueraded as a receipt, job offer, CV, shipment arrival notification, or some other subject that’s likely to draw the recipient’s attention. These emails go with attachments in .zip, .docm, or .js format. When opened or extracted, these objects covertly download the ransom Trojan onto the computer. Once inside the host environment, the harmful code tries to disable VSS (Volume Shadow Copy Service) and then starts scanning the hard disk, removable drives (if any), and network shares for files that may be valuable to the victim. It focuses on personal documents, images, videos, and databases while ignoring system files which, if corrupted, might cause the system to malfunction.

_readme.txt ransom note created by Masok virus

_readme.txt ransom note created by Masok virus

All the objects spotted in the course of the surreptitious scan are then encrypted. As it has been mentioned, the filenames get the .masok tail following the original extensions. By dropping the _readme.txt ransom message into all directories with ransomed data and onto the desktop, the pest explains what happened and explicates the techniques of reinstating the corrupted items. In particular, it says the victim has 72 hours to pay $490 worth of Bitcoin for the personal key and automatic decryptor. After this “grace period” expires, the ransom will double and amount to $980. In order to find out what BTC wallet the cryptocurrency should go to and how to proceed with the file restoration, the user is supposed to shoot a message to the attackers at gorentos@bitmessage.ch or gorentos2@firemail.cc and paste their personal ID in it.

Here are a few things to consider in regards to the recommendations imposed by the cyber-miscreants. First of all, you can’t possibly be sure that they will follow through with their promises and provide the recovery toolkit after the payment is made. Even if they do, such a scenario is still a cold comfort.

Malware researchers claim the Djvu/STOP ransomware may be decryptable for free, but on a condition that an offline key was used to scramble your data. This could be because the contaminated machine wasn’t connected to the Internet during data encryption, or the crooks’ Command & Control server was down at that time. However, neither circumstance is very likely.

One way or another, this vector of recovery is certainly worth a shot. An application called STOPDecrypter is what does the trick as long as the above requirements are met. Go ahead and install it, let it scan your computer, and see if your case is supported. If the tool skips your files, it means that the Masok ransomware encrypted them using an online key and there is no effective way to restore them unless you opt for the criminals’ terms. With that said, it is strongly advised to start the DIY remediation of the adverse changes with the following steps.

Automatic removal of Masok ransomware virus

When it comes to handling infections like this one, using a reputable cleaning tool is the place to start. Sticking to this workflow ensures that every component of the ransomware gets found and eradicated from the affected computer.

1. Download and install the cleaning tool and click the Start Computer Scan button

Download .masok file virus removal tool

2. The wait is worth it. Once the scan completes, you will see a report listing all malicious or potentially unwanted objects detected on your PC. Go ahead and click the Fix Threats option in order to get the ransom trojan automatically uninstalled from your machine. The following steps are intended to restore the encrypted files.

Recover .masok files ciphered by the Djvu ransomware

Removing the infection proper is only a part of the fix, because the seized personal information will stay encrypted regardless. Review and try the methods below to get a chance of restoring the files.

Option 1: Backups
The cloud works wonders when it comes to troubleshooting in the framework of ransomware assault. If you have been keeping data backups in a remote place, just use the respective feature accommodated by your backup provider to reinstate all encrypted items.

Option 2: Recovery tools
The research of the Masok/Djvu virus reveals an important fact about the way it processes the victim’s data: it deletes the original files, and it’s actually their copies that are encrypted. In the meanwhile, it is common knowledge that anything erased from a computer doesn’t completely vanish and can be dragged out of memory via certain techniques. Recovery applications are capable of doing this, so this method is surely worth a try.

Download Data Recovery Pro

Option 3: Shadow Copies
The Windows operating system incorporates a technology referred to as the Volume Snapshot Service, or VSS, which performs files or volumes backup routine automatically. One critical prerequisite in this regard is to have the System Restore feature toggled on. In case it has been active, some data segments can be successfully recovered.

You may perform this activity with the Previous Versions functionality, which is built into the OS, or by means of special applications that will do the job automatically.

  • Previous Versions feature
    Right-click on a file and choose Properties in the context menu. Find a tab named Previous Versions and click on it to view the last automatic backup that was made. Depending on a preferred action, click Restore to get the file recovered to its original location, or click Copy and indicate a new directory.Previous Versions feature
  • Shadow Explorer applet
    It’s remarkably easy to manage Previous Versions of files and folders with automated tools like Shadow Explorer. This program is free to use. Download and install it, let it come up with a profile of the file hierarchy on the computer, and get down to the restoration proper. You can select a drive name on the list, then right-click on the files or folders to recover, and click Export to proceed.Shadow Explorer

Did the problem go away? Check and see

Computer threats like ransomware may be stealthier than you can imagine, skillfully obfuscating their components inside a compromised computer to evade removal. Therefore, by running an additional security scan you will dot the i’s and cross the t’s in terms of the cleanup.

Download Masok ransomware scanner and remover

The post .Masok file extension virus decryptor and ransomware removal appeared first on Keone Software.
Remove “Virus Alert from Apple”

$
0
0

Get effective instructions on removing the Virus Alert from Apple scam and learn what risks the related malware poses to Mac users.

What is the Virus Alert from Apple scam?

The Virus Alert from Apple popup notification is the pivot of an ongoing hoax that targets Mac users. Its goal is to scare the victim into thinking their computer is severely damaged and sticking with a recommendation to contact “tech personnel” who are fraudsters in disguise. The misleading alert pops up on a malicious website camouflaged as an Apple support related resource. The page mimics the company logo, and some design elements are reminiscent of the genuine style everyone is familiar with. However, the first big giveaway is the URL that has nothing to do with Apple. Secondly, the actual provider will never engage in warning practices as abominable and obtrusive as this. Ultimately, the objective of this ruse is to persuade the user to give the wrong people a phone call.

Virus Alert from Apple popup hoax

Virus Alert from Apple popup hoax

Let’s now have a look at how exactly this scheme works. It usually starts with a questionably reasonable app installation the would-be victim performs. This routine involves a software bundle that drags several programs into the Mac rather than just one clearly mentioned on the setup client’s screen. While there is nothing illegal about such a package-based promotion, cybercriminals often weaponize it by adding harmful apps to the combo. In the scenario under scrutiny, the user unknowingly allows a piece of malware to infiltrate their Mac while being confident that the only item being installed is some freeware with a couple of nifty features on board. Therefore, it always makes sense to treat bundles with caution and at least opt out of the default install mode so that the possible extras are disclosed and can be deselected. Getting back to the point, the furtively downloaded infection instantly determines which web browser is the victim’s preferred one and unleashes its predefined disruptive power. In particular, it embeds a new plugin that turns the custom web surfing settings upside down.

Having adjusted the browser’s activity to its mission, the predatory code starts forwarding the hijacked traffic to a rogue site hosting the Virus Alert from Apple popups. These domains get blacklisted once in a while, so the URLs will vary. But, as mentioned above, the address is in no way affiliated with Apple, and fortunately, it doesn’t take a scientist to identify this major clue suggesting that it’s a scam. The fake alert on the page says the Mac has been blocked because of a virus that the user caught when visiting a porn site. It goes on to stress that Apple has locked down the computer to prevent the infection from spreading further and thwart detrimental consequences for the user.

The main tip on the phony site regarding the fix is to call the pseudo tech support or start a conversation with them via the built-in chat widget. However, if the swindlers are contacted they will most likely instruct the victim to give them remote access to the system so that they can supposedly repair it and eliminate the “virus”. In actuality, by gaining a foothold on the Mac this way, the crooks will install more malware and demand a fee for the troubleshooting. Therefore, in case you are still curious whether it’s a good idea to reach out to the operators of the Pornographic Virus Alert from Apple popup scam, the answer is a big “No”. Instead, get rid of the misbehaving entity that causes the browser redirects in the first place.

Automatic removal of the Virus Alert from Apple scam

When it comes to handling infections like this one, using a reputable cleaning tool is the place to start. Sticking to this workflow ensures that every component of the virus gets found and eradicated from the affected Mac.

1. Download and install Combo Cleaner onto your Mac.

Download Virus Alert virus removal tool

2. Run the tool and click Start Combo Scan to have it check your Mac for threats. The wait is worth it. Once the scan completes, you will see a report listing all performance issues as well as malicious or potentially unwanted objects detected on your machine.
Mac scan with Combo Cleaner

3. Go ahead and click the Remove Selected Items option in order to get the Virus Alert from Apple popup malware automatically uninstalled from your Mac.

This being done, you should be good to go. Just to make sure everything went smooth, though, consider going through the steps below. Furthermore, be advised that your default browser will still be redirected to the faux alert page until you rectify its settings (the reset procedure will be described further down).

Virus Alert from Apple hoax manual removal

The gist of this section is to walk you through the process of deleting all non-obfuscated files related to the popup virus. It’s best to perform the cleanup in the order specified below.

  • Click the Go icon in Finder and select Utilities on the listGo to Utilities on Mac
  • Find and select the Activity Monitor under UtilitiesAccess the Activity Monitor
  • In the Activity Monitor, scrutinize the running processes for one that consumes lots of CPU and looks suspicious. Once the likely baddie is found, select it and click the Quit Process icon. An additional confirmation dialog will pop up – click Force Quit on itEnd the potential pest’s process
  • Now, go to Applications under the Go menuGo to Applications
  • What you need to do is scroll down the list of installed apps in search of the malicious item. It could be a program with a gibberish name or one that ended up on your Mac beyond your awarenessUninstall the malicious app
  • Go to System Preferences as shown belowSystem Preferences on Mac
  • Select Accounts, then Login Items. You will see all the apps that run as part of the Mac startup process. Find the infection and remove it from the list by means of the “minus” iconMinus out the malware from Login Items

Now that you have suppressed the virus proper, you need to fix the redirect problem in the malfunctioning browser. The browser defaults continue to be set to a malicious page, therefore the repair requires some manual configuration tweaking.

Remove Virus Alert from Apple scam in web browser

The optimal troubleshooting method boils down to resetting the browser, which will undo all changes made by the infection or any third-party plugin without your permission. Here’s how to do it:

1. Reset Safari to its defaults

  • Go to Safari menu bar and select Preferences again on the drop-down listSafari menu bar - Preferences
  • Go to Advanced tab and enable the option that says Show Develop menu in menu barShow Develop menu in menu bar
  • Now you will see the extra Develop menu in your Safari menu bar. Click it and select Empty Caches as shown belowEmpty Caches in Safari’s Develop menu
  • Do some test browsing to see if things are okay now and whether the malware is gone. If the issue is still there, you may need to additionally clear your browsing history in Safari. In Safari menu bar, select History and click Clear HistoryClear history in Safari
  • The browser will display a dialog so that you can select the required period you would like to clear history for. Select all history on the list and click the Clear History buttonSelect period to remove history in Safari
  • In case Safari is still acting up due to malware interference, there is one more thing you can try. Once again, go to Preferences from the Safari menu bar and select the Privacy tab this time. Click Manage Website DataManage Website Data option in Safari
  • When Safari generates a full list of sites that have stored your browsing data, go ahead and click Remove AllRemove all website data
  • Confirm by hitting the Done button.

2. Reset Google Chrome

  • Click More ( icon) at the top right part of the Chrome window and select Settings
  • Find the Advanced section on the Settings screen and expand it
  • Locate the Reset settings subsection and click Restore settings to their original defaultsReset Chrome settings on Mac
  • Google Chrome will display a popup dialog asking you to confirm the reset. Click the Reset settings button on it. Now, restart the browser and ascertain that the problem has been fixed.

3. Refresh Mozilla Firefox

  • Go to Help -> Troubleshooting Information, or type about:support in the Firefox URL bar
  • Once the Troubleshooting Information screen appears, find and click the Refresh Firefox button as shownRefresh Firefox on Mac
  • Confirm the browser refresh on a dialog that will appear. Restart Firefox and check it for signs of malware tampering.

The post Remove “Virus Alert from Apple” appeared first on Keone Software.

Delete Mac Cleanup Pro scam from MacBook Air/Pro/iMac

$
0
0

This article provides comprehensive analysis of the Mac Cleanup Pro malware issue, including the infection’s behavioral quirks and ways to remove it from Mac.

What is the Mac Cleanup Pro virus?

One of the things the cyber world has in common with the world around us is that there are genuine entities and copycats that might be problematic to identify as such. In terms of Mac software, the niche of optimization and security apps is gaining traction these days, and so is the cluster of rogue programs that only pretend to be helpful. Mac Cleanup Pro falls under the scareware category because it mimics system tune-up features without actually doing anything the users will ever appreciate. It comes as a nifty-looking Mac utility that claims to be able to find common performance issues and easily repair them to boost the performance of the host machine. While the first impression about this application could be okay based on its GUI design and the speed at which it runs its scans, the tactic it employs ultimately proves this opinion wrong.

Mac Cleanup Pro might look good but doesn’t live up to its name

Mac Cleanup Pro might look good but doesn’t live up to its name

The Mac Cleanup Pro virus mostly arrives with bundles of freeware apps that aren’t necessarily junk but make the rounds as part of software packages. The fundamental issue with this distribution technique is that the “undercover” items accompanying the main one may be malicious, and the setup clients often don’t allow the users to get the big picture of what exactly is being installed as an extra. For instance, you may be happy to finally find some new free-of-charge media player on a software download portal you aren’t familiar with, but the joy vanishes once you realize that the default installation mode has pulled in Mac Cleanup Pro without letting you know. One more technique used to push this baddie resembles tech support scams, where a website suddenly pops up telling you that your MacBook Air/Pro or iMac is badly infested with threats and recommending you to downloading the “fix”, which is a rogue app in disguise.

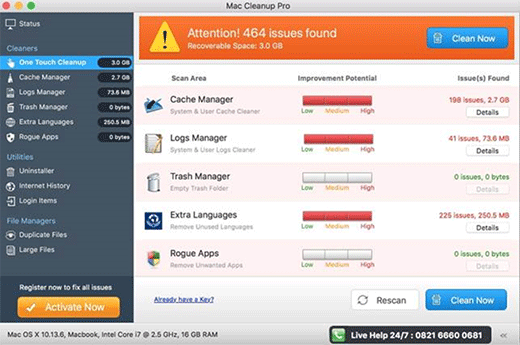
Once inside a Mac, the fishy utility in question will instantly draw all of your attention by starting a spoof system scan. It supposedly checks the computer for redundant files, such as all forms of cache, duplicates, large objects, unused files, logs you no longer need, and the like. When through with the checkup, the pest displays a report where nearly all of the above areas will be flagged red due to the allegedly high improvement potential. It will purport to have detected hundreds of unnecessary objects which, if deleted, will free up gigabytes of disk space. Being able to release so much memory is certainly a tempting option, but the pitfall is that most of these issues are made-up to hoodwink you into proceeding to the next step. It boils down to upgrading your subscription – in other words, Mac Cleanup Pro will instruct you to purchase its licensed copy otherwise the problems cannot be addressed.

If you think you can simply disregard these scan reports and follow-up popup reminders about system slowdown and possibly even viruses, you might be missing the point. This scareware will be gradually escalating the pressure through deliberate Mac performance deterioration, more alerts, and browser-related brainwashing. Speaking of the latter, the infection is known to interfere with DNS settings and may add a potentially harmful extension to the victim’s default browser, whether it’s Safari, Chrome or Firefox on Mac. This way, it causes the web traffic to be forwarded to misleading sites that may say “Your Mac is infected with 3 viruses” or include similarly scary warnings. The goal is to make you download the “featured” tool, which is the malware under scrutiny. Consequently, the attack gets more obnoxious over time, and it won’t discontinue unless Mac Cleanup Pro is completely removed.

Automatic removal of Mac Cleanup Pro virus

When it comes to handling infections like this one, using a reputable cleaning tool is the place to start. Sticking to this workflow ensures that every component of the virus gets found and eradicated from the affected Mac.

1. Download and install Combo Cleaner onto your Mac.

Download Mac Cleanup Pro removal tool

2. Run the tool and click Start Combo Scan to have it check your Mac for threats. The wait is worth it. Once the scan completes, you will see a report listing all performance issues as well as malicious or potentially unwanted objects detected on your machine.
Mac scan with Combo Cleaner

3. Go ahead and click the Remove Selected Items option in order to get Mac Cleanup Pro scareware automatically uninstalled from your Mac.

This being done, you should be good to go. Just to make sure everything went smooth, though, consider going through the steps below. Furthermore, be advised that your default browser may still be redirected to fake alert pages until you rectify its settings (the reset procedure will be described further down).

Mac Cleanup Pro redirect virus manual removal from Mac

The gist of this section is to walk you through the process of deleting all non-obfuscated files related to the Mac Cleanup Pro virus. It’s best to perform the cleanup in the order specified below.

  • Click the Go icon in Finder and select Utilities on the listGo to Utilities on Mac
  • Find and select the Activity Monitor under UtilitiesAccess the Activity Monitor
  • In the Activity Monitor, scrutinize the running processes for Mac Cleanup Pro or another one that consumes lots of CPU and looks suspicious. Once the likely baddie is found, select it and click the Quit Process icon. An additional confirmation dialog will pop up – click Force Quit on it
    End the potential pest’s process
  • Select Go to Folder option in Apple Finder, enter the following in the dialog’s search box: /Library/LaunchAgents, and click GoGo to Folder tool
  • When the LaunchAgents path is opened, look for these entries and send them to the trash:
    • com.MCP.agent.plist
    • com.MacCleanupPro.agent.plist
    • com.MCP.mcphlpr
    • com.MacCleanupPro.mcphlpr
  • Leverage the Go to Folder tool to access the path named ~/Library/LaunchAgents. Look for the above items and delete them if found
  • Follow the same procedure to go to ~/Library/LaunchAgents folder. Find the entries below and delete them if spotted:
    • MacCleanupPro
    • helpermcp
    • hlprmcp
    • hlprmaccleanuppro
  • Now, go to Applications under the Go menuGo to Applications
  • What you need to do is scroll down the list of installed apps in search of the malicious item. It could be manifested as Mac Cleanup Pro proper or an app with a gibberish name that ended up on your Mac beyond your awarenessUninstall the malicious app
  • Go to System Preferences as shown belowSystem Preferences on Mac
  • Select Accounts, then Login Items. You will see all the apps that run as part of the Mac startup process. Find Mac Cleanup Pro and remove it from the list by means of the “minus” iconMinus out the malware from Login Items

Now that you have suppressed the virus proper, you need to fix the redirect problem in the malfunctioning browser. The repair requires some manual configuration tweaking.

Stop browser redirects to pages promoting Mac Cleanup Pro

The optimal troubleshooting method boils down to resetting the browser, which will undo all changes made by the infection or any third-party plugin without your permission. Here’s how to do it:

1. Reset Safari to its defaults

  • Go to Safari menu bar and select Preferences again on the drop-down listSafari menu bar - Preferences
  • Go to Advanced tab and enable the option that says Show Develop menu in menu barShow Develop menu in menu bar
  • Now you will see the extra Develop menu in your Safari menu bar. Click it and select Empty Caches as shown belowEmpty Caches in Safari’s Develop menu
  • Do some test browsing to see if things are okay now and whether the malware is gone. If the issue is still there, you may need to additionally clear your browsing history in Safari. In Safari menu bar, select History and click Clear HistoryClear history in Safari
  • The browser will display a dialog so that you can select the required period you would like to clear history for. Select all history on the list and click the Clear History buttonSelect period to remove history in Safari
  • In case Safari is still acting up due to malware interference, there is one more thing you can try. Once again, go to Preferences from the Safari menu bar and select the Privacy tab this time. Click Manage Website DataManage Website Data option in Safari
  • When Safari generates a full list of sites that have stored your browsing data, go ahead and click Remove AllRemove all website data
  • Confirm by hitting the Done button.

2. Reset Google Chrome

  • Click More ( icon) at the top right part of the Chrome window and select Settings
  • Find the Advanced section on the Settings screen and expand it
  • Locate the Reset settings subsection and click Restore settings to their original defaultsReset Chrome settings on Mac
  • Google Chrome will display a popup dialog asking you to confirm the reset. Click the Reset settings button on it. Now, restart the browser and ascertain that the problem has been fixed.

3. Refresh Mozilla Firefox

  • Go to Help -> Troubleshooting Information, or type about:support in the Firefox URL bar
  • Once the Troubleshooting Information screen appears, find and click the Refresh Firefox button as shownRefresh Firefox on Mac
  • Confirm the browser refresh on a dialog that will appear. Restart Firefox and check it for signs of malware tampering.

The post Delete Mac Cleanup Pro scam from MacBook Air/Pro/iMac appeared first on Keone Software.

Remove SearchMarquis.com redirect virus from Mac

$
0
0

Amidst the security threats Mac users should be worried about, browser hijackers like SearchMarquis.com really stand out due to their aggressive essence.

What is the Search Marquis Mac virus?

If you happen to think Mac malware is a marginal thing, the SearchMarquis.com baddie will prove you wrong. In fact, malicious apps targeting devices that run the indisputably awesome macOS operating system have been around for quite some time, and they have become mainstream over the past few years. The strain mentioned above is a prime example of the multi-pronged cybercriminals campaigns from this category. Its adverse effects span browser interference for the most part, but the ostensibly limited attack surface is a false comfort. The victims are stuck with extremely annoying redirects to SearchMarquis.com website that are being triggered in their default browser for seemingly no obvious reason. There is a clear-cut cause, though. A piece of malware is behind every such quandary. The goal is to intercept Mac users’ Internet traffic and tunnel it towards another service via an ad network. This guile allows the crooks to monetize the attack to the fullest.

SearchMarquis.com Mac virus redirecting a browser to the rogue site

SearchMarquis.com Mac virus redirecting a browser to the rogue site

Which landing page is involved in this campaign? The answer might appear surprising to some – it’s Bing, the search engine provided by Microsoft. The whys and wherefores of such a weird stratagem lie in the very gist of the hijack. Like it has been mentioned, the route of the twisted web navigation in this scenario is more complex than it might appear. Technically, the victim departs from SearchMarquis.com and then hits several auxiliary domains, including the notorious SearchBaron.com, prior to landing on Bing.com. These visits are almost unnoticeable and can only be seen momentarily in the status bar at the bottom of the browser window. So, Bing is just a cover-up that’s supposed to add a hue of legitimacy to the electronic raid. What matters to the villains is the series of interstitial addresses being resolved along the way.

The trespass of the SearchMarquis.com virus is a covert encounter. Its payload is usually obfuscated by an install client that seems to facilitate the setup of an inoffensive app. The nifty program – usually freeware – is just the tip of the iceberg that distracts the Mac user from the ruse. It turns out that, by default, the bundle includes complementary items, the Search Marquis junk being among them. Steering clear of problems in this situation is ridiculously easy – all it takes is opting for custom install, which should reveal the entire list of the promoted applications and lets the user uncheck the redundant ones. However, prudence in this regard is hardly ever the case, which means people just click through and finish the process, only to realize that the wonderful free program has got company.

When up and running, the virus reorganizes the system configuration in such a way that the victim’s default web browser – Safari, Google Chrome, or Mozilla Firefox – returns SearchMarquis.com every time they try to open their homepage or favorite search engine. The settings replacement trick isn’t sophisticated per se, but the peculiar implementation with persistence at its core is an obstacle to the repair. In other words, switching back to the right web surfing preferences manually won’t help, because the virus will reapply the unwanted adjustments. In the aftermath of this attack, the affected browser will be instructed to resolve SearchMarquis.com off and on, which in its turn will be redirecting all searches to Bing while “touching” a few extra domains. It is, obviously, on nobody’s interest to endure such a mess. Here’s what to do to block the irritating browser redirects.

Automatic removal of SearchMarquis.com redirect virus from Mac

When it comes to handling infections like this one, using a reputable cleaning tool is the place to start. Sticking to this workflow ensures that every component of the virus gets found and eradicated from the affected Mac.

1. Download and install Combo Cleaner onto your Mac.

Download Mac Cleanup Pro removal tool

2. Run the tool and click Start Combo Scan to have it check your Mac for threats. The wait is worth it. Once the scan completes, you will see a report listing all performance issues as well as malicious or potentially unwanted objects detected on your machine.
Mac scan with Combo Cleaner

3. Go ahead and click the Remove Selected Items option in order to get Search Marquis redirect virus automatically uninstalled from your Mac.

This being done, you should be good to go. Just to make sure everything went smooth, though, consider going through the steps below. Furthermore, be advised that your default browser will still be redirected to SearchMarquis.com until you rectify its settings (the reset procedure will be described further down).

SearchMarquis.com redirect virus manual removal from Mac

The gist of this section is to walk you through the process of deleting all non-obfuscated files related to the Search Marquis redirect virus Mac. It’s best to perform the cleanup in the order specified below.

  • Click the Go icon in Finder and select Utilities on the listGo to Utilities on Mac
  • Find and select the Activity Monitor under UtilitiesAccess the Activity Monitor
  • In the Activity Monitor, scrutinize the running processes for one that consumes lots of CPU and looks suspicious. Once the likely baddie is found, select it and click the Quit Process icon. An additional confirmation dialog will pop up – click Force Quit on itEnd the potential pest’s process
  • Now, go to Applications under the Go menuGo to Applications
  • What you need to do is scroll down the list of installed apps in search of the malicious item. It could be a program with a gibberish name or one that ended up on your Mac beyond your awarenessUninstall the malicious app
  • Go to System Preferences as shown belowSystem Preferences on Mac
  • Select Accounts, then Login Items. You will see all the apps that run as part of the Mac startup process. Find the infection and remove it from the list by means of the “minus” iconMinus out the malware from Login Items

Now that you have suppressed the virus proper, you need to fix the redirect problem in the malfunctioning browser. The browser defaults continue to be set to SearchMarquis.com, therefore the repair requires some manual configuration tweaking.

Remove SearchMarquis.com redirects from affected browser on Mac

The optimal troubleshooting method boils down to resetting the browser, which will undo all changes made by the infection or any third-party plugin without your permission. Here’s how to do it:

1. Reset Safari to its defaults

  • Go to Safari menu bar and select Preferences again on the drop-down listSafari menu bar - Preferences
  • Go to Advanced tab and enable the option that says Show Develop menu in menu barShow Develop menu in menu bar
  • Now you will see the extra Develop menu in your Safari menu bar. Click it and select Empty Caches as shown belowEmpty Caches in Safari’s Develop menu
  • Do some test browsing to see if things are okay now and whether the malware is gone. If the issue is still there, you may need to additionally clear your browsing history in Safari. In Safari menu bar, select History and click Clear HistoryClear history in Safari
  • The browser will display a dialog so that you can select the required period you would like to clear history for. Select all history on the list and click the Clear History buttonSelect period to remove history in Safari
  • In case Safari is still acting up due to malware interference, there is one more thing you can try. Once again, go to Preferences from the Safari menu bar and select the Privacy tab this time. Click Manage Website DataManage Website Data option in Safari
  • When Safari generates a full list of sites that have stored your browsing data, go ahead and click Remove AllRemove all website data
  • Confirm by hitting the Done button.

2. Reset Google Chrome

  • Click More ( icon) at the top right part of the Chrome window and select Settings
  • Find the Advanced section on the Settings screen and expand it
  • Locate the Reset settings subsection and click Restore settings to their original defaultsReset Chrome settings on Mac
  • Google Chrome will display a popup dialog asking you to confirm the reset. Click the Reset settings button on it. Now, restart the browser and ascertain that the problem has been fixed.

3. Refresh Mozilla Firefox

  • Go to Help -> Troubleshooting Information, or type about:support in the Firefox URL bar
  • Once the Troubleshooting Information screen appears, find and click the Refresh Firefox button as shownRefresh Firefox on Mac
  • Confirm the browser refresh on a dialog that will appear. Restart Firefox and check it for signs of malware tampering.

The post Remove SearchMarquis.com redirect virus from Mac appeared first on Keone Software.

Remove Akamaihd Mac virus in Safari, Chrome, Firefox

$
0
0

With a large-scale outbreak of Akamaihd Mac virus being underway, there are methods to tackle the infection every victim should know about.

What is Akamaihd Mac virus?

Whereas browser takeover has always been a serious and annoying security issue, a recent boom in the Akamaihd Mac malware distribution has taken this phenomenon to the next level. This particular infection is a long-standing entity bolstering adware and malvertising campaigns for years, but it’s not until early 2020 that it has reached unprecedented heights and the trend appears to keep making itself felt consistently. The problem is all about virus-backed browser misconfiguration that entails multiple instances of traffic redirects via a URL with the a.akamaihd.net string in it.

A few common variants of this nuisance involve domain names that appear in the following format: lkysearchds[random digits]-a.akamaihd.net, search[random digits]-a.akamaihd.net, or default[random digits]-a.akamaihd.net. Several real-world examples doing the rounds at the time of this writing are lkysearchds5927-a.akamaihd.net and search1173423-a.akamaihd.net. These strings replace the web browser defaults without any clear permission on the victim’s end. The affected settings include the homepage and search engine preferred by the user. As a result, Safari, Chrome, and Firefox iteratively resolve the wrong page on the contaminated Mac machine.

Chrome on Mac taken over by akamaihd.net virus

Chrome on Mac taken over by Akamaihd virus

Although a specific variant of the akamaihd.net domain is listed in the malfunctioning browser’s customizations (see screenshot above), it’s not the one the affected user actually ends up visiting. This URL is an auxiliary link in a redirect chain that ultimately resolves another search provider. Although one of the landing sites dragged into this plot is the legit Yahoo Search, the hoax may also lead to known-malicious entities such as Search Pulse or Any Search. In the former course of events, the page under scrutiny plays the role of an intermediary resource dispatching the web navigation in such a way that it arrives at the trustworthy web service mentioned above.

This is an intricate tactic aimed at disguising outright malicious activity as something relatively benign. The primary goal of the malefactors is to tunnel the intercepted web traffic through a series of ad networks while making the whole ruse seem like a glitch with harmless search results at its core. Upon a little bit of closer inspection, though, the destination site turns out to be a custom Yahoo page whose header mentions Safe Finder, a dubious service that gained notoriety for being massively promoted by malware.

Safari settings modified by akamaihd.net threat

Safari settings modified by Akamaihd threat

Contrary to the attack scenario revolving around the exploitation of Yahoo Search to instill a false sense of legitimacy, the akamaihd.net Mac virus can reroute the hijacked web browser to something clearly sketchy. For instance, the resulting pages can be search.searchpulse.net or search.anysearchmanager.com. Both are associated with infamous Mac browser hijacking campaigns run by a high-profile cybercriminal group. None of them returns authentic results of its own, simply operating as an ad-driven Internet traffic trading platform. It’s a shame that all of this profit making is being done at the expense of regular Mac users who fell victim to the browser-centered threat.

The propagation method that dominates the episode of modern cybercrime featuring the akamaihd virus is quite vanilla. It largely comes down to the fake Adobe Flash Player update stratagem involving deceptive popups shown on hacked or malicious websites. As controversial as it is in terms of gaping security loopholes, Adobe Flash is one of the things every user knows about. Therefore, a popup ad that recommends installing the latest version of this product to view some content online is likely to encourage a user to opt in. However, there are numerous trojanized variants of the application out there that disseminate Mac viruses in the same bundle. Therefore, it’s certainly a good idea to avoid installing such updates if they are pushed by intrusive alerts on websites. If the akamaihd infection is already wreaking havoc on a Mac, here are the steps that will help get rid of it.

Automatic removal of akamaihd.net virus from Mac

If this threat has infected your Mac, the most effective way to get rid of it is to use an automatic cleaning tool. The main benefit of taking this route is that the security application will accurately pinpoint and remove all the malicious files, including hidden components that could be difficult to find and erase manually. MacBooster is an award-winning solution that makes this process easy and fast. Follow the steps below to make the most of its malware removal and optimization power:

1. Download and install MacBooster onto your Mac.

Download Akamaihd virus removal tool

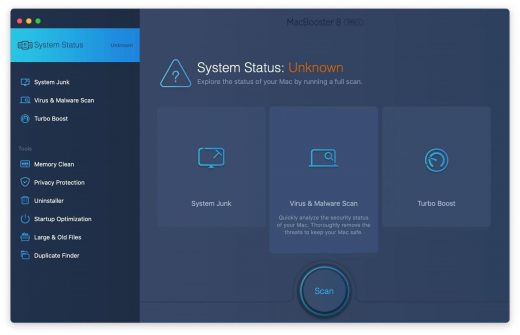
2. Open the tool and click on the Scan button on its home screen called System Status. The application will check your Mac for viruses and malware, memory issues, and junk files.
MacBooster home screen

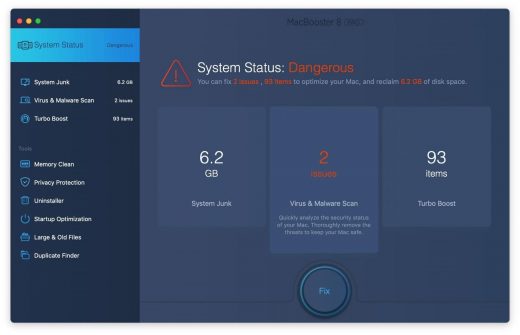
3. Once the scan is completed, MacBooster will display a report listing all the security and performance problems detected on your computer. Click on the Fix button to remove the malicious items and fine-tune your Mac’s performance.MacBooster scan results at a glance

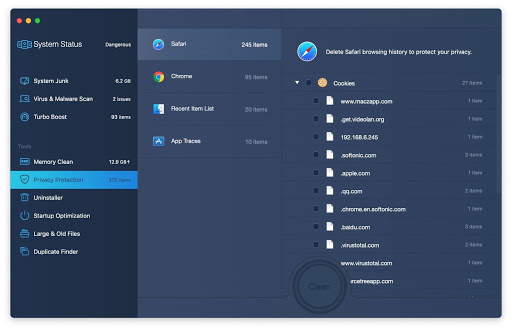
4. To address the after-effects of akamaihd.net virus activity in the web browser, select the Privacy Protection feature in MacBooster sidebar, choose your default browser, and click on the Clean button at the bottom. This will delete unwanted cookies and other items affecting the browser behavior.Remove unwanted browser cookies

The akamaihd.net virus shouldn’t be messing around with your Mac any longer. Be advised, though, that your default browser may still be redirected to dubious pages until you rectify its settings (the reset procedure will be described further down).

Akamaihd redirect virus manual removal from Mac

The gist of this section is to walk you through the process of deleting all non-obfuscated files related to the Akamaihd redirect virus Mac. It’s best to perform the cleanup in the order specified below.

  • Click the Go icon in Finder and select Utilities on the listGo to Utilities on Mac
  • Find and select the Activity Monitor under UtilitiesAccess the Activity Monitor
  • In the Activity Monitor, scrutinize the running processes for one that consumes lots of CPU and looks suspicious. Once the likely baddie is found, select it and click the Quit Process icon. An additional confirmation dialog will pop up – click Force Quit on itEnd the potential pest’s process
  • Now, go to Applications under the Go menuGo to Applications
  • What you need to do is scroll down the list of installed apps in search of the malicious item. It could be a program with a gibberish name or one that ended up on your Mac beyond your awarenessUninstall the malicious app
  • Go to System Preferences as shown belowSystem Preferences on Mac
  • Select Accounts, then Login Items. You will see all the apps that run as part of the Mac startup process. Find the infection and remove it from the list by means of the “minus” iconMinus out the malware from Login Items

Now that you have suppressed the virus proper, you need to fix the redirect problem in the malfunctioning browser. The browser defaults continue to be set to akamaihd.net related domain, therefore the repair requires some manual configuration tweaking.

Remove Akamaihd redirects from affected browser on Mac

The optimal troubleshooting method boils down to resetting the browser, which will undo all changes made by the infection or any third-party plugin without your permission. Here’s how to do it:

1. Reset Safari to its defaults

  • Go to Safari menu bar and select Preferences again on the drop-down listSafari menu bar - Preferences
  • Go to Advanced tab and enable the option that says Show Develop menu in menu barShow Develop menu in menu bar
  • Now you will see the extra Develop menu in your Safari menu bar. Click it and select Empty Caches as shown belowEmpty Caches in Safari’s Develop menu
  • Do some test browsing to see if things are okay now and whether the malware is gone. If the issue is still there, you may need to additionally clear your browsing history in Safari. In Safari menu bar, select History and click Clear HistoryClear history in Safari
  • The browser will display a dialog so that you can select the required period you would like to clear history for. Select all history on the list and click the Clear History buttonSelect period to remove history in Safari
  • In case Safari is still acting up due to malware interference, there is one more thing you can try. Once again, go to Preferences from the Safari menu bar and select the Privacy tab this time. Click Manage Website DataManage Website Data option in Safari
  • When Safari generates a full list of sites that have stored your browsing data, go ahead and click Remove AllRemove all website data
  • Confirm by hitting the Done button.

2. Reset Google Chrome

  • Click More ( icon) at the top right part of the Chrome window and select Settings
  • Find the Advanced section on the Settings screen and expand it
  • Locate the Reset settings subsection and click Restore settings to their original defaultsReset Chrome settings on Mac
  • Google Chrome will display a popup dialog asking you to confirm the reset. Click the Reset settings button on it. Now, restart the browser and ascertain that the problem has been fixed.

3. Refresh Mozilla Firefox

  • Go to Help -> Troubleshooting Information, or type about:support in the Firefox URL bar
  • Once the Troubleshooting Information screen appears, find and click the Refresh Firefox button as shownRefresh Firefox on Mac
  • Confirm the browser refresh on a dialog that will appear. Restart Firefox and check it for signs of malware tampering.

The post Remove Akamaihd Mac virus in Safari, Chrome, Firefox appeared first on Keone Software.

Remove “Your computer is low on memory” Mac virus pop up

$
0
0

Whereas a pop p error on Mac saying “Your computer is low on memory” seems to be a self-explanatory occurrence, it could as well indicate malware activity.

What is “Your computer is low on memory” Mac virus?

RAM, generally referred to as memory, is a flexible entity that adjusts itself to the user’s computing and ensures that enough processing power is allocated for all the tasks running concurrently. In other words, it is the fundamental element of multitasking on a Mac that makes things smooth and user-friendly. But what if the installed capacity becomes scarce for handling day-to-day tasks? There are quite a few reasons for such a predicament: applications become more resource-intensive over time; people growingly use graphics editing software; and macOS gets more sophisticated with each new update, the flip side being that older Mac models simply cannot support these ever-inflating requirements down the line. Regardless of the specific cause, the system’s response to this undersupply is to trigger an alert saying, “Your computer is low on memory”. However, few users know that the exact same pop up may be a clue that malware has cropped up on the computer.

Your computer is low on memory’ pop up alert on Mac

Your computer is low on memory’ pop up alert on Mac

The malicious side of the matter is that threat actors may use this notification as part of their scare or cross-promotion tactics. They are well aware that people never ignore alerts like this one. The average user’s natural reaction is to sort things out because they fear inability to use their Mac due to the lack of memory. At the very least, they will read the recommendation on the dialog that goes, “To free up some memory, please close a few applications” and click on the Close button to move on to the troubleshooting. The catch is that this single click of a mouse may be an obfuscated way of authorizing something sketchy. It can be a springboard for installing Mac adware that instantly turns the victim’s web browsing preferences upside down by imposing rogue settings. It can also serve as a method for a potentially unwanted application (PUA), which is already inside the system, to escalate its privileges without clearly asking for such a permission.

For instance, “Your computer is low on memory” pop up virus can be a contagion promoting SearchBaron, an infamous browser hijacker that causes redirects to Bing via searchbaron.com domain. This ostensibly odd exploitation logic is aimed at redistributing and monetizing unique Internet traffic. There are several more Mac adware strains that cash in on the same hoax. These include such nasties as BeAware, Spaces.app, and ScreenSaver.app. Their impact mostly comes down to redundant ads being shown across websites the user visits. Mac scareware is yet another type of harmful code that generates spoofed “Your computer is low on memory” pop ups. In this case, the objective is to make the victim believe that the machine is acting up and thereby persuade them to purchase the junk app.

It’s also worth mentioning that the low memory alert is often a real response of the Mac to malware activity that siphons off a good deal of system resources. Given the entirety of dubious root causes for this warning dialog to appear, the right course of action is to inspect the computer for traces of malicious software and purge the pest without delay.

Automatic removal of “Your computer is low on memory” pop up virus from Mac

If this threat has infected your Mac, the most effective way to get rid of it is to use an automatic cleaning tool. The main benefit of taking this route is that the security application will accurately pinpoint and remove all the malicious files, including hidden components that could be difficult to find and erase manually. MacBooster is an award-winning solution that makes this process easy and fast. Follow the steps below to make the most of its malware removal and optimization power:

1. Download and install MacBooster onto your Mac.

Download “Your computer is low on memory” popup virus removal tool

2. Open the tool and click on the Scan button on its home screen called System Status. The application will check your Mac for viruses and malware, memory issues, and junk files.
MacBooster home screen

3. Once the scan is completed, MacBooster will display a report listing all the security and performance problems detected on your computer. Click on the Fix button to remove the malicious items and fine-tune your Mac’s performance.MacBooster scan results at a glance

4. To address the after-effects of “Your computer is low on memory” virus activity in the web browser, select the Privacy Protection feature in MacBooster sidebar, choose your default browser, and click on the Clean button at the bottom. This will delete unwanted cookies and other items affecting the browser behavior.Remove unwanted browser cookies

“Your computer is low on memory” virus shouldn’t be messing around with your Mac any longer. Be advised, though, that your default browser may still be redirected to dubious pages until you rectify its settings (the reset procedure will be described further down).

“Your computer is low on memory” virus manual removal from Mac

The gist of this section is to walk you through the process of deleting all non-obfuscated files related to “Your computer is low on memory” Mac virus. It’s best to perform the cleanup in the order specified below.

  • Click the Go icon in Finder and select Utilities on the listGo to Utilities on Mac
  • Find and select the Activity Monitor under UtilitiesAccess the Activity Monitor
  • In the Activity Monitor, scrutinize the running processes for one that consumes lots of CPU and looks suspicious. Once the likely baddie is found, select it and click the Quit Process icon. An additional confirmation dialog will pop up – click Force Quit on itEnd the potential pest’s process
  • Now, go to Applications under the Go menuGo to Applications
  • What you need to do is scroll down the list of installed apps in search of the malicious item. It could be a program with a gibberish name or one that ended up on your Mac beyond your awareness (e.g. BeAware, Spaces or ScreenSaver)Uninstall the malicious app
  • Go to System Preferences as shown belowSystem Preferences on Mac
  • Select Accounts, then Login Items. You will see all the apps that run as part of the Mac startup process. Find the infection and remove it from the list by means of the “minus” iconMinus out the malware from Login Items

Now that you have suppressed the virus proper, you need to fix the redirect problem in the malfunctioning browser. The browser defaults continue to be set to a related malicious domain, therefore the repair requires some manual configuration tweaking.

Stop “Your computer is low on memory” virus from affecting web browser on Mac

The optimal troubleshooting method boils down to resetting the browser, which will undo all changes made by the infection or any third-party plugin without your permission. Here’s how to do it:

1. Reset Safari to its defaults

  • Go to Safari menu bar and select Preferences again on the drop-down listSafari menu bar - Preferences
  • Go to Advanced tab and enable the option that says Show Develop menu in menu barShow Develop menu in menu bar
  • Now you will see the extra Develop menu in your Safari menu bar. Click it and select Empty Caches as shown belowEmpty Caches in Safari’s Develop menu
  • Do some test browsing to see if things are okay now and whether the malware is gone. If the issue is still there, you may need to additionally clear your browsing history in Safari. In Safari menu bar, select History and click Clear HistoryClear history in Safari
  • The browser will display a dialog so that you can select the required period you would like to clear history for. Select all history on the list and click the Clear History buttonSelect period to remove history in Safari
  • In case Safari is still acting up due to malware interference, there is one more thing you can try. Once again, go to Preferences from the Safari menu bar and select the Privacy tab this time. Click Manage Website DataManage Website Data option in Safari
  • When Safari generates a full list of sites that have stored your browsing data, go ahead and click Remove AllRemove all website data
  • Confirm by hitting the Done button.

2. Reset Google Chrome

  • Click More ( icon) at the top right part of the Chrome window and select Settings
  • Find the Advanced section on the Settings screen and expand it
  • Locate the Reset settings subsection and click Restore settings to their original defaultsReset Chrome settings on Mac
  • Google Chrome will display a popup dialog asking you to confirm the reset. Click the Reset settings button on it. Now, restart the browser and ascertain that the problem has been fixed.

3. Refresh Mozilla Firefox

  • Go to Help -> Troubleshooting Information, or type about:support in the Firefox URL bar
  • Once the Troubleshooting Information screen appears, find and click the Refresh Firefox button as shownRefresh Firefox on Mac
  • Confirm the browser refresh on a dialog that will appear. Restart Firefox and check it for signs of malware tampering.

The post Remove “Your computer is low on memory” Mac virus pop up appeared first on Keone Software.


7 of the most popular and annoying malware for Mac

$
0
0

Macs can get viruses and malware. As Macs become more popular, hackers and rogue programmers see them as a more lucrative target now. Here are seven of the most popular viruses, malware and scams for Mac.

1. Browser hijackers

While browser hijackers are not viruses in the traditional sense where they copy and spread across your entire computer, they can be just as malicious. Typically, browser hijackers will adjust your browser settings without your permission. They’ll change things like your homepage and your default search engines to things like Bing, Yahoo and Search Baron to name a few. The reason browser hijackers change those settings are so they can track your search in web browsing history, including passwords.

How did a browser hijacker get on your Mac? Usually, they’re bundled with other suspicious software that you might have installed. The browser hijackers come under such names as Search Baron, Weknow Search or Search Marquis. There are many of them.

2. Trojan viruses

Trojans trick your Mac and its users into thinking it’s a legitimate program before wreaking havoc on your computer after it’s installed. Like a Trojan horse, they carry the unseen apps inside them which stay in the shade on your Mac.

The most popular Mac Trojan is arguably GravityRat. Once it’s on your computer, it uploads Microsoft Office files, takes random screenshots, and records your keystrokes. If you find yourself having to download apps on mass download sites or torrents, then you should definitely consider a Mac antivirus to help protect you.

3. FruitFly

FruitFly is malware that has stolen millions of pictures, tax records, and webcam images. But the scariest part about FruitFly can go undetected by most antivirus applications. So just because your antivirus is saying your Mac is safe doesn’t mean FruitFly isn’t on there. Apple also has done their best to patch up macOS. But it’s unknown if newer versions exist and are now sneaking around.

4. X-Agent

X-Agent was designed primarily to steal sensitive data like passwords, iPhone backups, and take screenshots of information it couldn’t transmit. It’s a highly sophisticated piece of malware. And it’s allegedly responsible for infamous attacks on TV stations, global organizations, and governments like the German Parliament and even the White House. It can get on your Mac by being bundled without legitimate applications. The most popular app was a downloader called Complex.

5. MacDownloader

While it might sound harmless, MacDownloader describes itself as an update for Adobe Flash and prompts users to enter their admin passwords. After they do, MacDownloader then has access to everything on their computer and will send files to a remote server.

Something to keep in mind is that Adobe no longer supports Flash. So if you’re being asked to update it, that means something funny is definitely going on.

6. KeyRanger ransomware

Ransomware gets on your computer to encrypt your data and prevent you from accessing it until the hackers pay a ransom. Typically in Bitcoin. KeyRanger works exactly in this way. And it gets access to your Mac because it’s bundled with an app called Transmission. So, when you install Transmission v. 2.90, you’re likely installing KeyRanger as well.

7. Phishing Emails

Have you received emails about suspicious logins to your Apple ID? This one is not from apple.com, but comes from a different address like apple-id-apple.com. Which is a scam domain. This is called a phishing email. And no, I don’t mean emails about your upcoming fishing trip. Phishing emails with a “ph” are emails that look like they’re coming from a legitimate source, but ask you to login or send sensitive information.

So that in turn, they can steal your passwords and gain access to all of your accounts. If you’re ever unsure about an email, check the sender’s email address. It should come from an address you recognize and not look randomized. Tip: Hover your pointer over the destination link and you can see the real address where it wants you to click.

For the most part, using a Mac is a fairly safe and malware-free experience. But no computer is safe 100% of the time. So knowing what to look out for keeps you ahead of the game.

The post 7 of the most popular and annoying malware for Mac appeared first on Keone Software.
How to remove Critical Virus Alert pop-up on Mac

$
0
0

This article delves deep into the anatomy of Critical Virus Alert pop-up scam, its modus operandi, and how users can protect themselves.

What is the Critical Virus Alert pop-up scam?

The Critical Virus Alert scam is a classic example of this new wave of threats. It starts with a browser redirect, often coupled with social engineering tactics. The endgame? To flood the user’s Mac desktop with pop-up warnings, urging them to click on a link that supposedly scans their system for threats.

The pop-up notifications associated with this scam are hard to miss. Positioned prominently on the right-hand side of a Mac’s desktop, they flash messages like “Critical Virus Alert. Click Here To Scan.” To make them appear more legitimate, they often feature a shield icon. Clicking on these notifications redirects users to fraudulent web pages that either attempt to extract payment for cleaning non-existent infections or pave the way for more malicious malware through drive-by downloads.

Critical Virus Alert pop-ups

Moreover, these alerts are often accompanied by other equally alarming notifications, such as:

  • “System is infected! Click here to scan.”
  • “System Is At Risk. Click Here To Renew Antivirus.”
  • “Viruses Found (3). Click Here To Scan.”

The goal is clear: instill fear and urgency, pushing the user to take action.

While the scam might seem sophisticated, there are telltale signs that can help users identify it. For instance, some alerts may contain grammatical errors or exaggerate the severity of the purported issues. The key is to remain vigilant and treat permission requests on unfamiliar websites with skepticism.

The scam often begins when a user clicks on a search engine result that redirects to a dubious page. To view the content, the user might be prompted to allow notifications, sometimes under the guise of human verification. Granting such permissions is a grave mistake, as it allows the malicious website to display web push notifications, the very medium the Critical Virus Alert scam leverages.

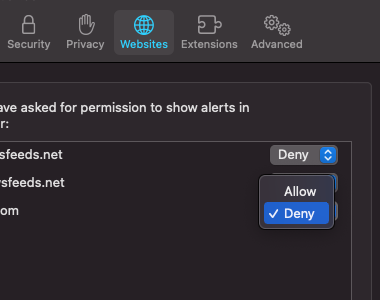
If a user falls prey to this scam, the first line of defense is the browser settings. For instance, in Safari, one can navigate to Preferences, click on the Websites tab, scroll down to Notifications, and ensure that any unfamiliar websites are set to “Deny”.

Deny websites notifications in Safari

However, if the user has extensively interacted with the scam alerts and related landing pages, it’s prudent to check the Mac for related malware and misconfigurations. Manual removal steps involve navigating through various system folders and removing suspicious files. Alternatively, tools like MacBooster can automate the malware detection and removal process.

Automatic removal of Critical Virus Alert pop-up scam from Mac

If this threat has infected your Mac, the most effective way to get rid of it is to use an automatic cleaning tool. The main benefit of taking this route is that the security application will accurately pinpoint and remove all the malicious files, including hidden components that could be difficult to find and erase manually. MacBooster is an award-winning solution that makes this process easy and fast. Follow the steps below to make the most of its malware removal and optimization power:

1. Download and install MacBooster onto your Mac.

Download Critical Virus Alert pop-up virus removal tool

2. Open the tool and click on the Scan button on its home screen called System Status. The application will check your Mac for viruses and malware, memory issues, and junk files.

MacBooster home screen

3. Once the scan is completed, MacBooster will display a report listing all the security and performance problems detected on your computer. Click on the Fix button to remove the malicious items and fine-tune your Mac’s performance. MacBooster scan results at a glance 4. To address the after-effects of Critical Virus Alert pop-up virus activity in the web browser, select the Privacy Protection feature in MacBooster sidebar, choose your default browser, and click on the Clean button at the bottom. This will delete unwanted cookies and other items affecting the browser behavior. Remove unwanted browser cookies

The Critical Virus Alert pop-up virus shouldn’t be messing around with your Mac any longer. Be advised, though, that your default browser may still be redirected to dubious pages until you rectify its settings (the reset procedure will be described further down).


Critical Virus Alert pop-up manual removal from Mac

The gist of this section is to walk you through the process of deleting all non-obfuscated files related to the Critical Virus Alert pop-up virus Mac. It’s best to perform the cleanup in the order specified below.

  • Click the Go icon in Finder and select Utilities on the list Go to Utilities on Mac
  • Find and select the Activity Monitor under Utilities Access the Activity Monitor
  • In the Activity Monitor, scrutinize the running processes for one that consumes lots of CPU and looks suspicious. Once the likely baddie is found, select it and click the Quit Process icon. An additional confirmation dialog will pop up – click Force Quit on it End the potential pest’s process
  • Now, go to Applications under the Go menu Go to Applications
  • What you need to do is scroll down the list of installed apps in search of the malicious item. It could be a program with a gibberish name or one that ended up on your Mac beyond your awareness Uninstall the malicious app
  • Go to System Preferences as shown below System Preferences on Mac
  • Select Accounts, then Login Items. You will see all the apps that run as part of the Mac startup process. Find the infection and remove it from the list by means of the “minus” icon Minus out the malware from Login Items

Now that you have suppressed the virus proper, you need to fix the problem in Safari. The browser defaults continue to be set to Critical Virus Alert pop-up, therefore the repair requires some manual configuration tweaking.


Remove Critical Virus Alert scam from affected browser on Mac

The optimal troubleshooting method boils down to resetting the browser, which will undo all changes made by the infection or any third-party plugin without your permission. Here’s how to do it:


Reset Safari to its defaults

  • Go to Safari menu bar and select Preferences again on the drop-down list Safari menu bar - Preferences
  • Go to Advanced tab and enable the option that says Show Develop menu in menu bar Show Develop menu in menu bar
  • Now you will see the extra Develop menu in your Safari menu bar. Click it and select Empty Caches as shown below Empty Caches in Safari’s Develop menu
  • Do some test browsing to see if things are okay now and whether the malware is gone. If the issue is still there, you may need to additionally clear your browsing history in Safari. In Safari menu bar, select History and click Clear History Clear history in Safari
  • The browser will display a dialog so that you can select the required period you would like to clear history for. Select all history on the list and click the Clear History button Select period to remove history in Safari
  • In case Safari is still acting up due to malware interference, there is one more thing you can try. Once again, go to Preferences from the Safari menu bar and select the Privacy tab this time. Click Manage Website Data Manage Website Data option in Safari
  • When Safari generates a full list of sites that have stored your browsing data, go ahead and click Remove All Remove all website data
  • Confirm by hitting the Done button.

Reset Google Chrome

  • Click More ( icon) at the top right part of the Chrome window and select Settings
  • Find the Advanced section on the Settings screen and expand it
  • Locate the Reset settings subsection and click Restore settings to their original defaults Reset Chrome settings on Mac
  • Google Chrome will display a popup dialog asking you to confirm the reset. Click the Reset settings button on it. Now, restart the browser and ascertain that the problem has been fixed.

Refresh Mozilla Firefox

  • Go to Help -> Troubleshooting Information, or type about:support in the Firefox URL bar
  • Once the Troubleshooting Information screen appears, find and click the Refresh Firefox button as shown Refresh Firefox on Mac
  • Confirm the browser refresh on a dialog that will appear. Restart Firefox and check it for signs of malware tampering.

The post How to remove Critical Virus Alert pop-up on Mac appeared first on Keone Software.
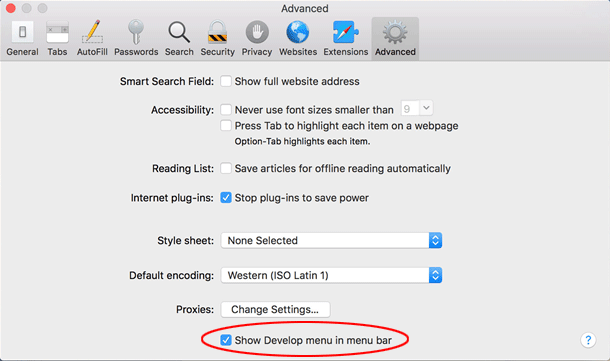


Latest Images